We spend countless hours in our laundry rooms, scrubbing out stains, pressing our best and even washing the dog. Shouldn’t we make this space as functional and pleasant as possible?
Laundry rooms have come a long way from the barren basement rooms so many of us grew up with. Take a few tips from these uber-practical laundry-room additions to help you lighten your load.
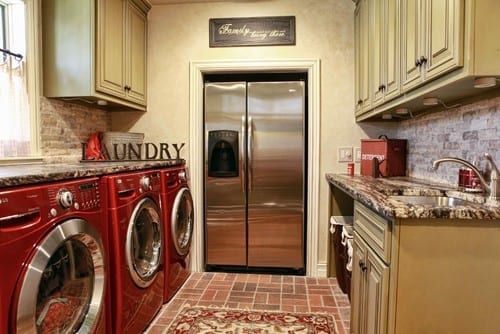
Refrigerator. Many homes have a second refrigerator in the garage, but these homeowners put one in the laundry room. Building it into the wall helped save space.
Tip: If you’re not ready to go that far, a mini fridge (no built-in necessary) could still help you store extra beverages.
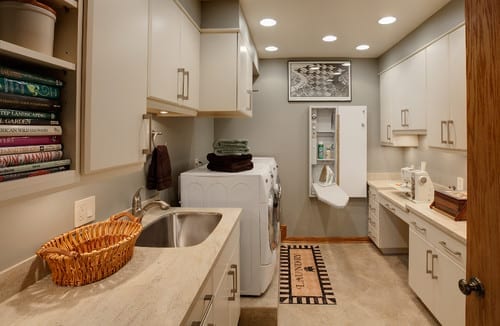
Sewing station. Anyone who enjoys sewing knows what a pain it is to set up and take down your clunky machine every time you want to make a repair or tackle a project. A special sewing station in your laundry room can help you get your work done with an ironing board and other necessities nearby.
Tip: Lower the counter height to 30 inches and knock out a cabinet for some knee space. Make sure there’s an electrical outlet nearby, and don’t forget task lighting to help you thread your needle.
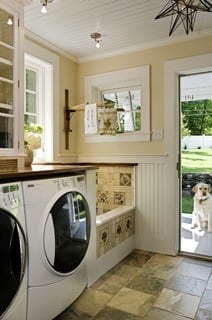
Dog washing tub. Every friend and neighbor with a pooch will be green with envy when you show them your personal dog washing station. This is a great addition for laundry rooms that have an entrance to the outdoors or a garage. Wash Fido’s dirty paws and soiled fur before he comes into the house.
Tip: Tiling the washing station and your laundry-room floors will make cleanup a cinch.
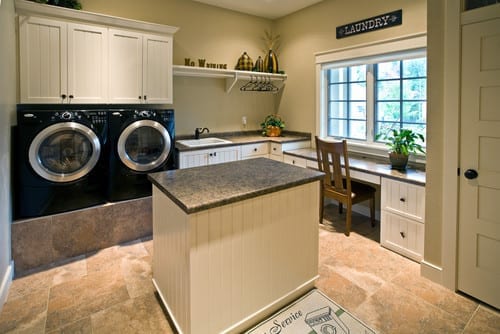
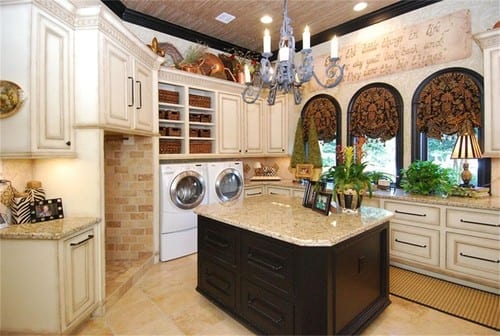
Raised washer and dryer. Bending down to take heavy loads of clothes out of a washer and dryer isn’t good for anyone’s back. A platform like this takes the (literal) pain out of washing and drying and has a seamless look.
Tip: Aim to lift your washer and dryer at least 15 inches for the best fit.
Drip-drying location. A drip-dry station in this spacious laundry room allows wet garments to dry without making a mess. In lieu of more cabinetry, this cavity was tiled all over for ultimate water protection.
Tip: A bar from the top provides a spot to hang clothes, and the floor drain guarantees there is no standing water.
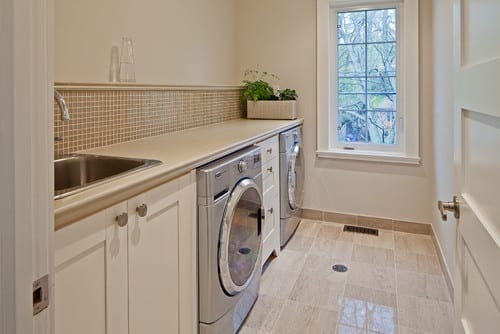
Floor drain. Even if you don’t have a specialized drip-dry spot, a floor drain can be a great idea in your laundry room. Not only does it make everyday cleaning easy, it can also prevent serious damage if your washing machine ever leaks or overflows.
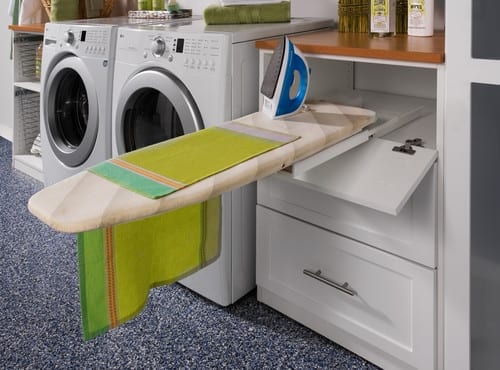
Ironing board. For those short on space, a drawer ironing board can give you the benefits of a built-in board without taking up wall or cabinet space. You’ll never have to wrestle with a squeaky freestanding board again. These are easy to retrofit into budget remodels, too.
Hampers. Built-in laundry hampers like these can help you keep your laundry space extra tidy with minimal effort. When the clothes are piling up, just make sure the drawers are closed! This homeowner has a hamper for whites, colors and darks — all tucked away and out of sight.
Photo Credit: Dennis Jourdan Photography via Remodeling Magazine
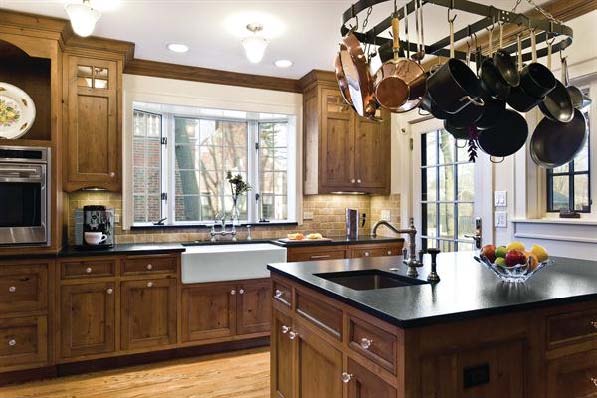
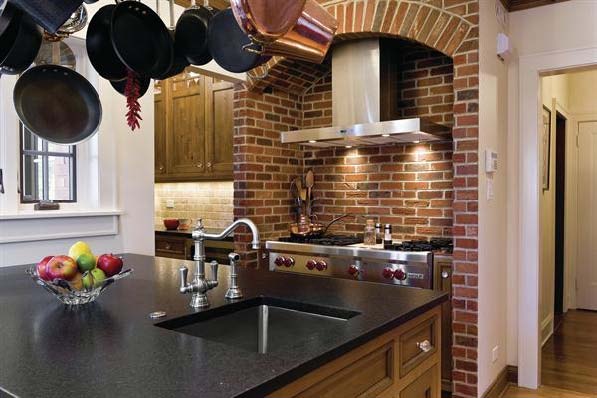
Room for Two: Alder cabinets, honed granite countertops and a tumbled marble backsplash give this kitchen a rustic feel.
The homeowners of this 1920s house (pictured above) had been planning a kitchen remodel for a long time. They went so far as to work on a design that would enclose the porch to expand the space, then got cold feet during the market downturn, and, worrying about the return on investment for an addition, put the project on hold.
By the time designer Diane Lawson, of Diane Lawson Designs in Nashville, TN; met the couple, they had revisited the project but had opted to stay within the existing footprint. However, they presented her with a long list of desires that included: good traffic flow for two cooks, separate cooking areas, an island, increased storage, and a rustic Italian design and details that would blend with the home’s Italianate style.
Though most homeowners today want to open up the kitchen to the rest of the house, Lawson says this couple bucked the trend, choosing to maintain the separation from the living and dining rooms.
Fitting in the long list of the client’s wants required some compromise, including a peninsula rather than an island, but Lawson viewed the project as putting a puzzle together to set all the pieces neatly in to the outline.
Photo Credit: Dennis Jourdan Photography via Remodeling Magazine
Window & Wall Upgrade: When the original windows were replaced with low-E units, insulation was also added to the exterior wall.
Puzzle Pieces
To help create a rustic Italian feel, the clients chose knotty alder cabinets. Lawson says that this species has increased in popularity during the last 10 years and that the wood – sometimes referred to as “poor man’s cherry” because of it’s similar grain and reddish tones – can cost 10% to 15% less than cherry.
Since not all manufacturers carry alder, Lawson opted for custom cabinetry. Going with a custom shop also had the advantage of enabling her to maximize storage and create a furniture look with cabinets that fit the age and style of the house. “[The choice] boils down to [the client’s] wish list and what they are looking to achieve,” Lawson explains. “And, of course, budget.”
The clients wanted to use the same finish throughout the kitchen – a rare choice these days, Lawson says. Currently, most of her clients are opting for a contrasting finish for the island.
Lawson had known remodeler Michael Menn, of Michale Menn Ltd., in Chicago, for almost 20 years and brought him on to help her with the extensive remodel. The ceiling above the sink had a soffit. Menn removed it to accommodate Lawson’s design, which took the cabinets to the ceiling to provide extra storage.
One of Lawson’s biggest design challenges was the traffic pattern for the family’s two “heavy-duty chefs” and keeping them out of each other’s way. The original freestanding island really affected the pattern, so Lawson moved the island to abut a wall. “While you don’t have access on all four sides [of the island],” Lawson says, “it gave us more room in the busy aisle-way, which is the main entry into the kitchen and is where we needed as much space as possible” – especially when one of the cooks is standing at the island prep sink.
The island has a small trash cabinet and a shelf for the client’s heavy stand-mixer.
Photo Credit: Dennis Jourdan (photo) | Nicole Babcock (floorplan) via Remodeling Magazine
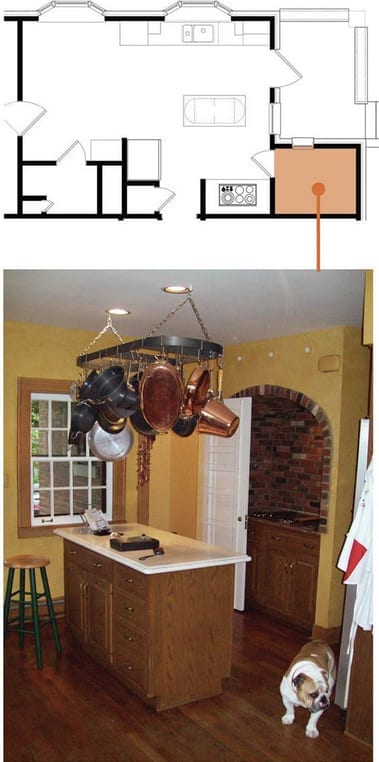
Into the fold: Removing the door and adding upper and lower cabinets makes this former pantry feel like part of the main kitchen.
Photo Credit: Dennis Jourdan (photo) | Nicole Babcock (floorpan) via Remodeling Magazine
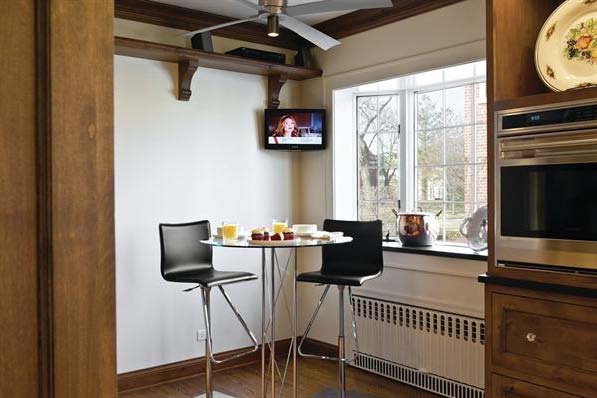
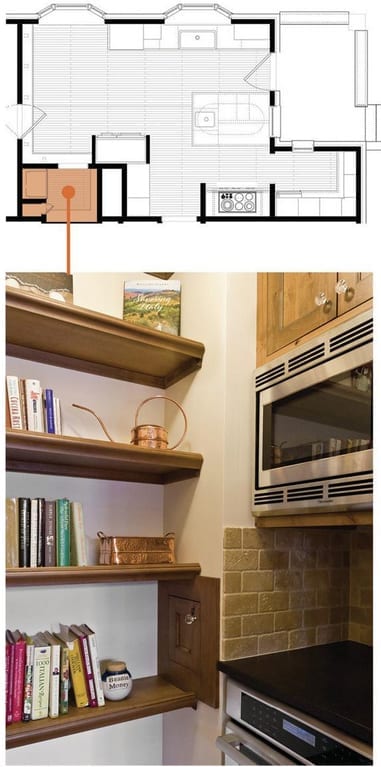
Cook Nook: The second pantry has a microwave and an oven. The existing laundry chute remains – but it has been reframed to match the cabinetry.
Separate Yet Cohesive
The existing 360-square-foot kitchen included two under-utilized pantries. Lawson thought the 18-square-foot closet next to the stove alcove would work better as a butler’s pantry, so Menn removed the door to make it part of the kitchen and replaced the wire-rack shelves with cabinets that match those in the main kitchen. The L-shaped run of cabinets has upper and lower cabinets and a countertop. An undercounter wine refrigerator is the only appliance.
The other 24-square-foot closet is closer to the dining room. Lawson considered removing the walls to incorporate it into the dining space, but there were two obstacles to doing that: a laundry chute in the closet and a two-story chimney that runs adjacent to that pantry. “We were bound,” Menn says, but the team also thought that retaining the quaint “little pockets” of space matched the style of the 90-year-old home. As they had done with the other closet, the crew removed the door. The existing closet had some shelves, an outlet, and a hanging bulb. The new space contains an oven, counter space, and upper shelves with a microwave. The wife likes to bake, and this area gives her a space to work in while her husband prepares food in the main kitchen area.
Photo Credit: Dennis Jourdan Photography via Remodeling Magazine
Brick or Treat
The original cooking alcove was outlined with faux brick. The clients liked the idea of a brick alcove and felt that it fit well with the new design’s rustic feel. And, Lawson says, the material ties in with the brick porch outside the kitchen.
Menn and Lawson thought the alcove could be enhanced to make more of a statement, so Menn’s team created a taller, softer arch at the top of the opening and installed real brick – cut ¾-inch thick – on the entire wall, as well as on the wall adjacent to the butler’s pantry.
The alcove also has contemporary features, including a sleek stainless steel hood, a Wolf cooktop, and a stainless steel storage drawer custom-made by the cabinet shop. The hood is actually made for an above-island installation that the clients had considered for the addition version of the project. They liked the shape, so Menn installed it here. He made custom ductwork to meet local code and vented the hood through an exterior wall. Narrow base pull-out cabinets flank the stove and hold spices.
(You’re reading ‘Standing Room Only’ originally posted on Remodeling)
“Going green” is more than just a passing phase – being environmentally thoughtful has become a way of life for many Americans, not to mention businesses that serve their needs. From recycling bottles and cans to investing in a do-it-yourself composter, homeowners all over the country are doing their part to help reduce emissions and protect the planet for future generations.
There are plenty of small things you can do to make your home more energy efficient, but what if you want to go a step further? Whether you’re building a new home or renovating your current place, these green remodeling ideas will save you money over that long haul and make your home more appealing to buyers when you’re ready to sell – while saving the earth in the process.
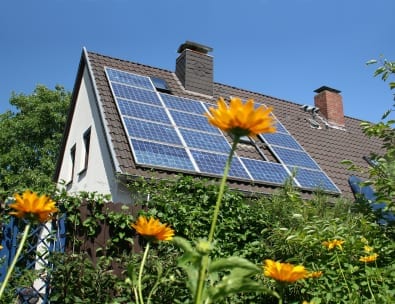
Solar Panels
They’re expensive to install, but solar panels are worth the investment. Last April, the Lawrence Berkley National Laboratory released its findings of an eight-and-half-year study of the California real estate market. According to the report, existing homes that were retrofitted with solar panels sold for an average of $17,000 more than comparable homes without them.
They’ll also save you a lot of money over time. For example, a homeowner in Chicago who pays an average of $200 per month on electricity would spend more than $43,000 to have solar panels installed. After tax credits and rebates, the total cost would be just over $30,000. However, after just one year, that homeowner would save anywhere between $1,200 to $2,778 on electric bills. After 25 years, that savings could be as high as $116,560.
To find out how much solar panels could save you, visit: Solar-Estimate.org
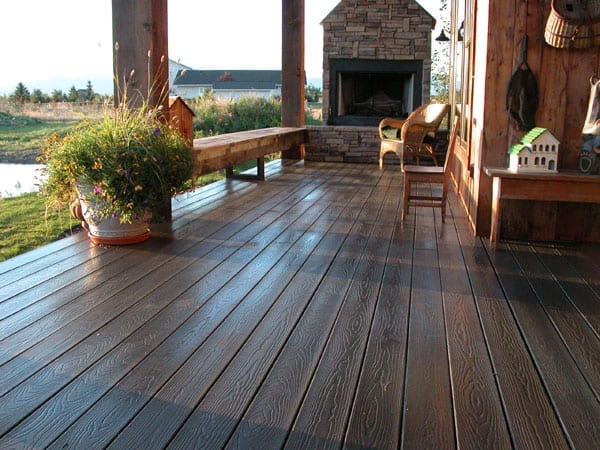
Composite Decking
In addition to saving trees by using composite decking instead of wood, you’ll save yourself a big hassle. Wooden decks need to be sealed every couple years to keep water out, and eventually the elements will cause at least a few boards to rot and splinter.
Composite decking, made from a blend of wood waste and plastic, doesn’t require the same upkeep as traditional wood deck boards. You won’t need to seal it, which eliminates the time and money you’d spend resealing plus fewer chemicals will be released into the air. And since the deck won’t rot, no trees will be cut down and used to replace it after a few years.
The average cost of a composite deck addition is $15,579, according to Remodeling Magazine, but you can expect to recoup more than 60% of your cost when you sell your home – more than if you replaced your roof or added a master suite.
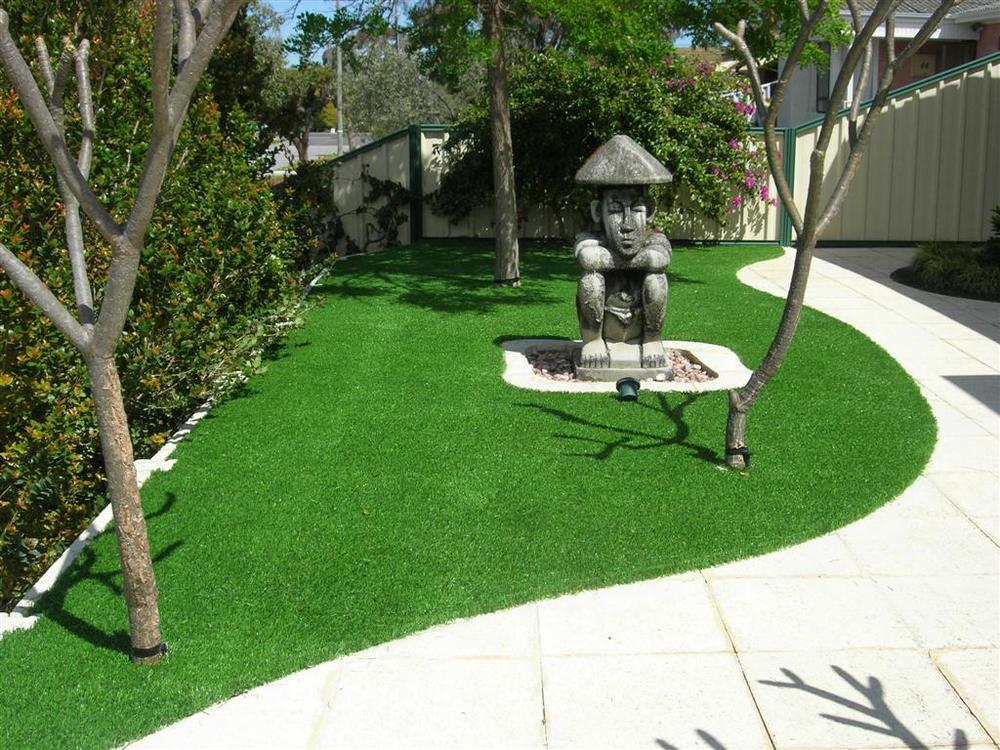
Synthetic Grass
It sounds crazy, but using fake grass in your yard is a real thing. It looks surprisingly real, and is great for homes in dry climates where it requires a lot of extra effort – and water – to grow the real thing. According to online retailer Artificial Turf Supply, the synthetic stuff costs about twice as much to install as sod. In a 1,500 square-foot yard, ground prep, sod and a sprinkler system would cost $4,750 a year while artificial grass would run just over $10,000.
But over an eight-year period (the warranty period of the synthetic grass listed on the site), the cost of maintaining a sod lawn would cost more than $14,500. During that same period, there would be no additional costs to maintain the fake stuff, which means a savings of more than $4,000. After 15 years, the savings skyrockets to $13,000. Basically, artifical turf pays for itself completely.
And you’re doing more than putting money in your pocket. You may still “rinse” the lawn from time to time, but you won’t waste gallons of water saturating the ground to keep the grass alive. It doesn’t need mowing, either, which means lower gasoline emissions polluting the air.
No matter what green home remodeling project you want to pursue, make sure you find yourself a like-minded contractor. Look for a pro who has some experience in green building, or is at least open-minded and eager to get an eco-friendly project under his or her belt.