Granite is one of the most elegant choice for a kitchen countertop. It is very easy to clean and will make you proud of your kitchen. Granite countertops add a touch of elegance to any space. This natural material is exceptionally durable, and fits any décor style. The challenge in selecting the right material is that there are so many styles, patterns, and colors that it can be difficult to choose. There are several factors to consider when selecting the right granite countertop. Here are a few reason you’ll want to consider granite for your next project.
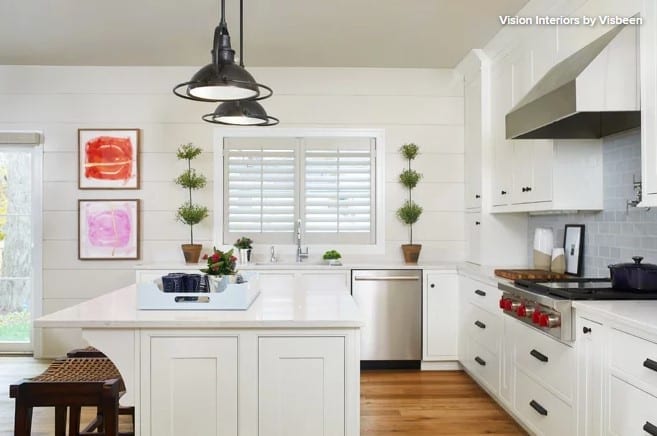
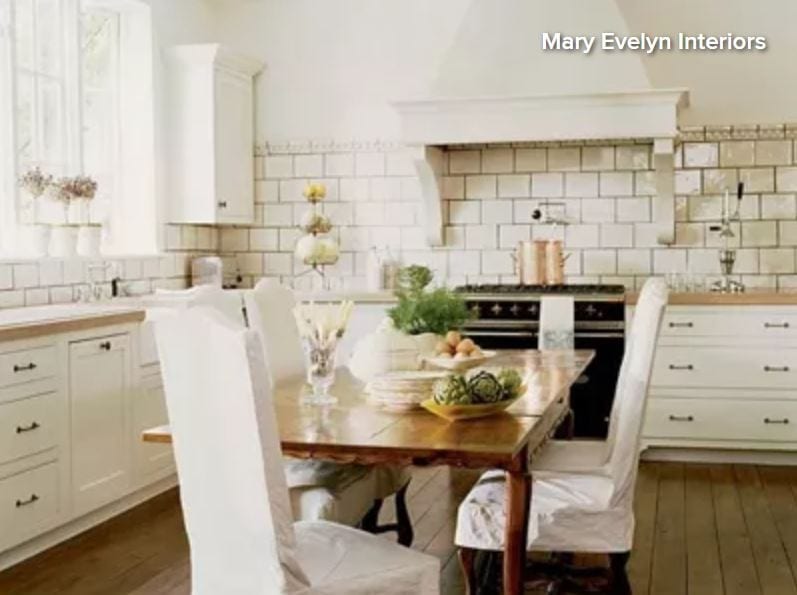
Kitchen
Hygienic Solid Surface Countertops
Solid surface countertops might be the perfect choice for your next kitchen or bath remodel. Let’s look at some of its health-promoting properties.
Solid surface has been around for more than 50 years. It is being used more and more in healthcare, restaurant, and hospitality settings because of its hygienic properties. With the rise of the pandemic and other health concerns, cleanliness and good hygiene are on everyone’s minds. To ease these concerns, solid surface might just be the perfect choice for your next kitchen or bath remodel. Let’s take a look at some of the benefits of solid surface countertops.
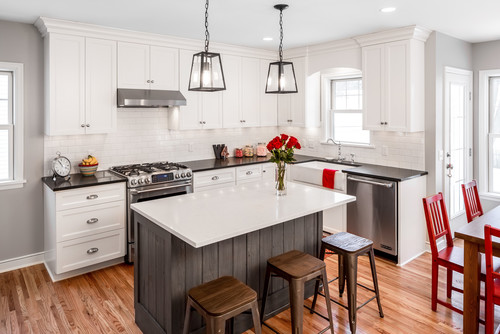
Smooth Solutions to Kitchen Counter Corners
The designers of these kitchens found creative ways to ease the transition from counter to walking zone.
Erin Carlyle April 26, 2020. Writing about the cost of renovation and what it takes to remodel. Former Forbes real estate reporter. Fascinated by cool homes, watching the bottom line.
It’s pretty standard for kitchen cabinets to run in a straight line until they meet the end of a wall or the start of a doorway. But sometimes, that isn’t the smoothest route. These six kitchens employ clever alternatives for ending a run of cabinets. Though the solutions vary, each makes the nearby passageway feel a little more smooth. Could this be a solution for your kitchen?
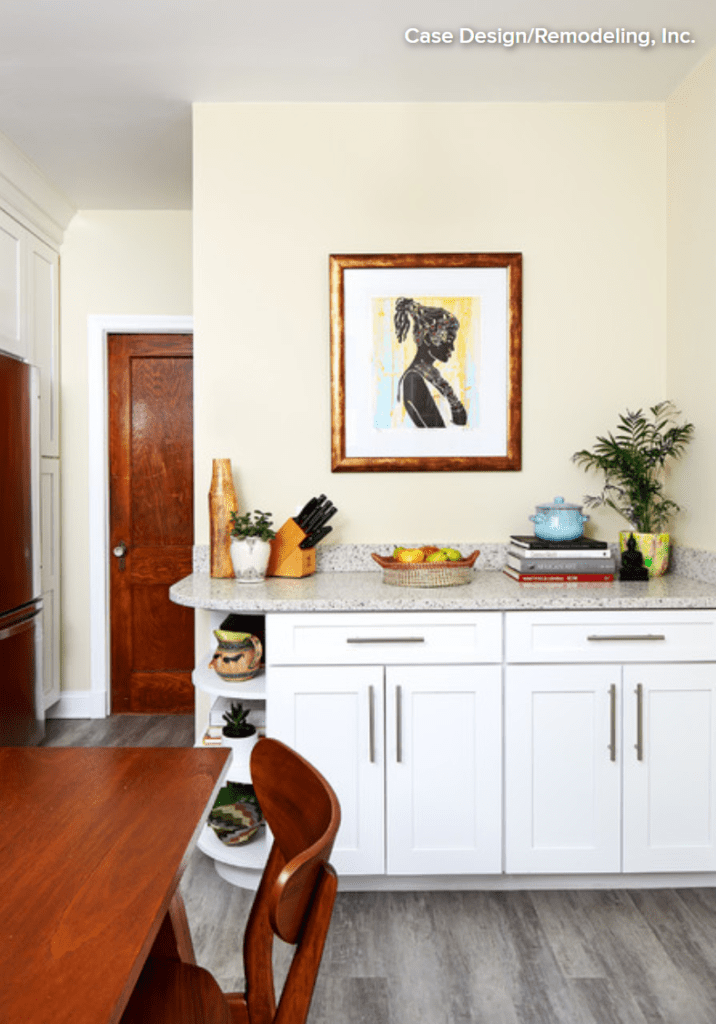
1. Curved Toward Walkway
For this Northwest Washington, D.C., kitchen by Case Architects & Remodelers, the designer gave the countertop a curve to soften the lines and give the space a transitional feel. The curve is also a practical choice because the counter abuts a walkway that heads toward a door. A curve in the pebbled quartz countertop means there’s no sharp corner to hit should you make a misstep.
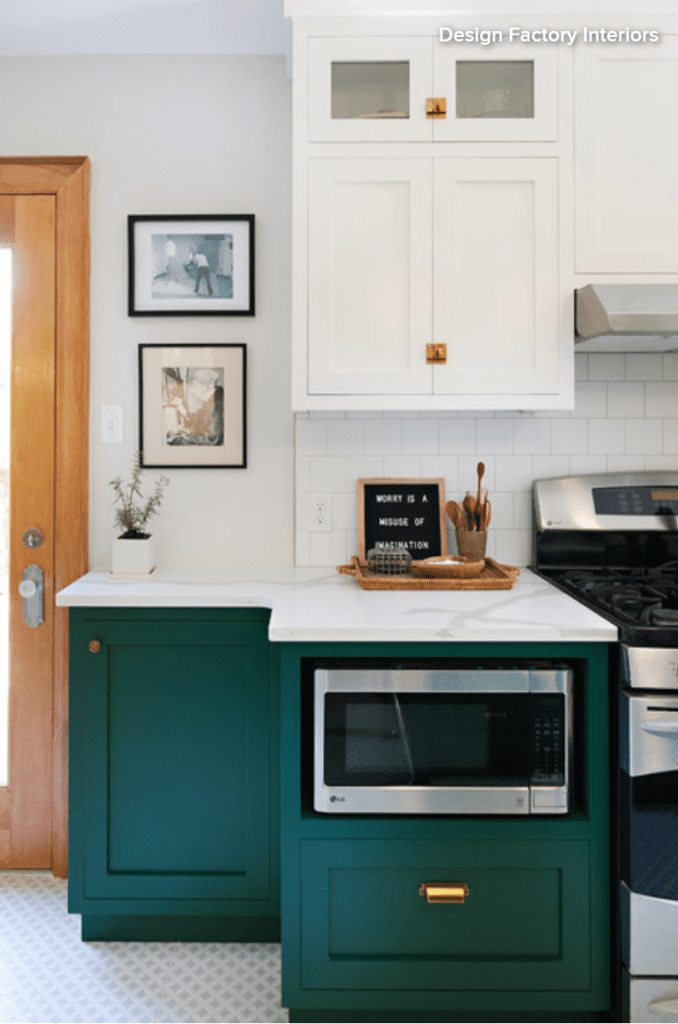
2. Recessed by Door
Another way to pull the counter back from the walkway is to recess it, as Shannon Eckel-Braun of Design Factory Interiors did for this Waterloo, Ontario, kitchen. Instead of a full-depth cabinet abutting the door that leads outside, a 12-inch-deep cabinet creates some breathing room. “I wanted it to be recessed back so you feel like you can smoothly walk around it,” Eckel-Braun says. “I didn’t want the countertops to just end.”
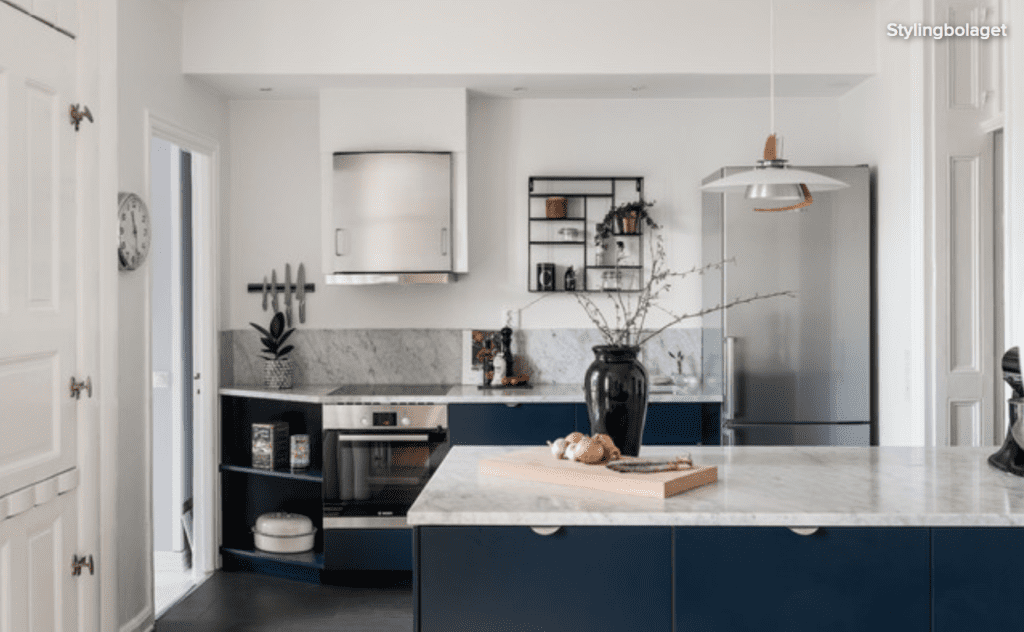
3. Angled by Door
This kitchen in Stockholm, Sweden, by Stylingbolaget has a range that sticks out farther than the doorway wall. One option would have been to stop the run of counter where the range ends.
But the designer found a solution that also adds storage: angling the countertop to the left of the range so it forms a wedge that looks interesting but not awkward. More important, it creates a smooth route in and out of the kitchen. And with the space used for open shelving rather than a traditional closed cabinet, all that space is easily accessed.
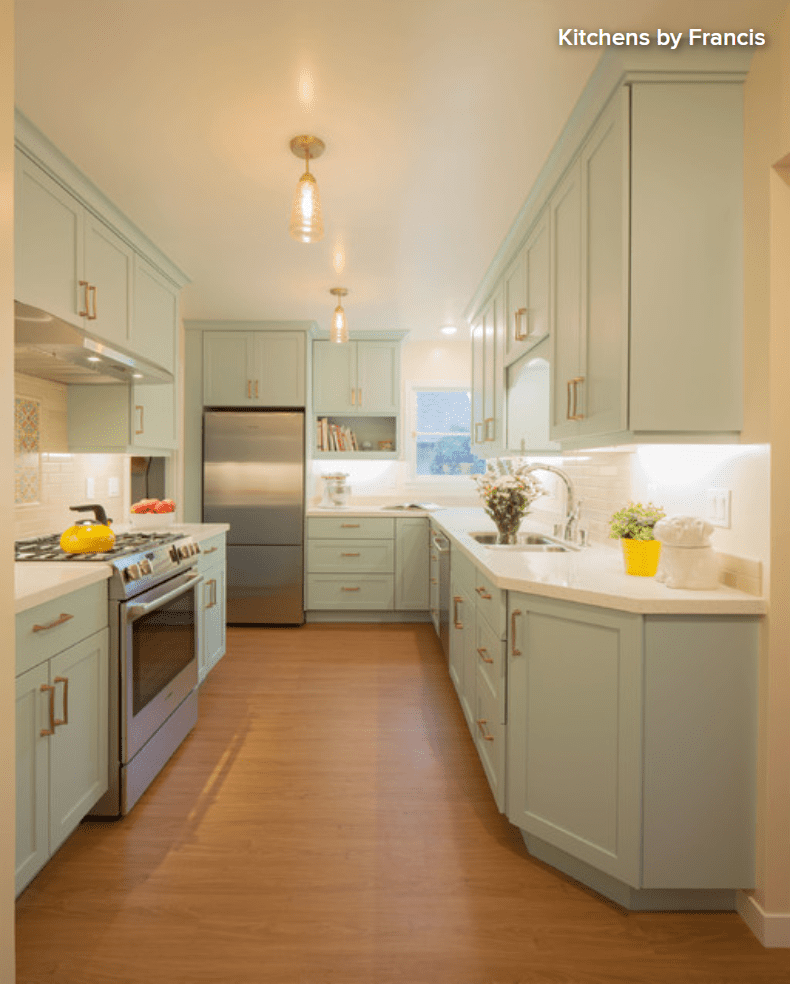
Here’s a more traditional way to angle a counter near a doorway: with a corner cabinet. The shape of this end run of cabinets in Oakland, California, by Kitchens by Francis invites you into the room. It also smooths the way out — you can glide right by via an efficient diagonal route.
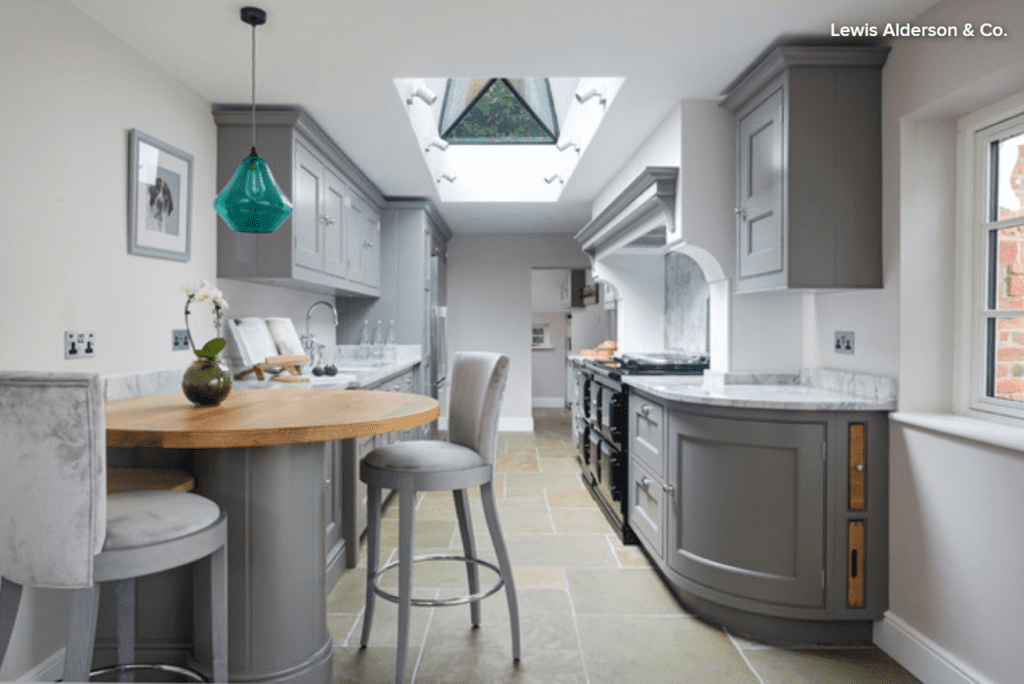
4. Rounded on End of Run
The designer of this kitchen in Hampshire, England, used curves to soften the lines of this long, narrow kitchen. The curve of the tall breakfast table echoes the curve of the cabinet by Lewis Alderson & Co. Both curves distract the eye from the otherwise long, straight shape of the space. The cabinet’s curve also allows space for a walkway around the table.
5. Rounded on Island
In this Minneapolis kitchen by Crystal Kitchen + Bath, squared-off cabinets at the perimeter maximize storage, but the curved shape of this island’s end zone offers a practical way to avoid uncomfortable bumps where people tend to hang out. As with the first example in this story, rounding the island adds to the room’s transitional feel, as do the speckled countertops and horizontal bar pulls on the cabinets.

5 Trade-Offs to Consider When Remodeling Your Kitchen
It would be great to have an unlimited budget for a kitchen renovation. But the fact is most of us do not. And that’s OK. Compromises of one form or another are part of the process, even for the rare homeowner who enjoys a bottomless budget and expansive square footage.
But how, exactly, do you decide between two compelling options with different pros and cons? The most critical tool to have on hand to help you make tough choices is a clear picture of your remodel goals. To get clarity on what matters most to you, read about some key trade-offs you and your kitchen designer will consider during your project.
How Will You Use Your Kitchen?
When planning a kitchen remodel, you want to be very clear on how you want to use your new kitchen. Here is one example: I want to have people over more often. I want to feel relaxed when I entertain. In order to feel relaxed, I need to make sure that no one is in my way while I cook. I also want my kitchen to stay neat during the cooking process and be laid out so that cleaning up will be efficient.
Clear goals can help homeowners make decisions and, as the budget nears its limit, ultimately choose the options that will best support their goals. What matters most to you in a kitchen?
1. Daily Use vs. Special Events
This area of consideration has to do with how many people your kitchen will serve. From refrigerator storage to seats at the dining table, the number of people you want to accommodate will affect your design choices. You’ll want to consider not only how many people live in the home now, but — if this is your forever home — how many will live in it 10 years from now. Also, how often do you entertain and for how many people?
I had a client who was retired and cooked only for herself and her husband most days. She entertained just four times a year, on holidays. At first, I was a bit baffled by her choice of a 36-inch range, double ovens and a 48-inch-wide refrigerator. But for her, these choices made sense.
As the matriarch of a large family, on those four holidays she cooked for 25 to 30 people and had at least two or three people helping her in the kitchen. It was important to her that we designed a flexible space that worked just as well when cooking for two as for 30.
That approach is a good one: Whenever possible, I recommend that clients design with their maximum capacity needs in mind.
2. Cost vs. Value
As you may have discovered if you’re considering a remodel (or in the midst of one), everything from cabinets to sinks to appliances comes at a variety of price points. How do you decide when it’s worth it to splurge for a high-quality item and when it’s best to save your dollars? Here are some questions to ask yourself:
-
Will the investment improve your everyday life?
-
Will the product solve a pet peeve?
-
Will the addition of this element make your house feel like a home?
-
Will the purchase increase the value of your home?
In each of these cases, you may decide that the cost of a feature for your new kitchen is worth it because of the value it brings. For example, a better dishwasher might eliminate the need to prerinse dishes.
Perhaps you hate scrubbing dishes, can afford an upgrade and would cherish any minute of spare time away from the sink. Or perhaps you feel quite the opposite: You don’t mind scrubbing dishes at all, and this investment wouldn’t be worth the pennies spent.
Framing your choices as cost vs. value — in terms of your experience in your kitchen, and possibly the resale value of your home — can help you get clarity on what’s worth the extra money.
One helpful way to prioritize your desires is to analyze the frequency and duration of a given task. Tasks you do frequently or spend more time on should get more weight as you consider what is worth investing in.
For example, most people use the burners to cook 80 percent of the time, the oven 20 percent of the time. If this applies to you, I recommend prioritizing the cooktop as opposed to the wall oven, both in terms of placement in your kitchen and quality of product. You wouldn’t want to give up a great burner feature to get a fancier oven.
On the other hand, if you are a frequent baker but rarely use the stovetop, you may prefer to invest in wall ovens rather than spend your budget on a fancy range. For you, it would be better to make sure that reaching into the oven is more ergonomic — done while standing upright, rather than bending over.
3. Function vs. Aesthetics
Ideally a kitchen redesign brings both beauty and function, but when we are dealing with limited funds, trade-offs between functionality and aesthetics may be necessary. By function, I mean not only the kinds of bells and whistles you get with high-end appliances, but also the kitchen’s layout and the choice of whether to have one sink or two.
Aesthetics, of course, are the expensive but gorgeous finishes and customized detailing that bring a high-end look to a kitchen. Quite often, a budget may force you to make choices on what matters most to you — the functionality or the look.
This area of trade-off is deeply personal and has a lot to do with your lifestyle. When weighing aesthetics vs. function, you’ll want to consider everything I mentioned before: how many people you cook for daily, how often you entertain, the kind of entertaining you do (backyard barbecues vs. sit-down dinners), the style of cooking you prefer and how many people work in the kitchen at one time.
For example, a client who doesn’t do a lot of cooking and is more concerned with the kitchen’s look than its function might really want a beautiful built-in fridge with custom panels but be willing to use a less expensive range or counter material to have that pricey, beautiful fridge.
On the other hand, I have had several clients (including the owners of the kitchen in this photo) who chose a free-standing fridge and put their budget into the plumbing and construction work required to add a second sink. To me, this is a significant functional improvement and, for those who enjoy cooking and entertaining, worth scaling back on some of the aesthetic details.
There are many ways you can cut back on aesthetics to create room in your budget for what’s important to you functionally. You might consider a simpler, less expensive door style on the cabinets, or a ceramic backsplash tile instead of glass, or quartz counters instead of granite.
I even had one client use a very inexpensive laminate counter so that she could put more money into the remodel work necessary to get the layout just right. Since she was in her forever home, she replaced the laminate with a beautiful stone two years later when finances allowed.
4. Speed vs. Patience
Any home improvement project takes time — that’s just part of the process. And once the kitchen is demolished and construction is underway, any delay can be difficult, particularly if you are living in the home and dealing with the mess. When you are in that situation, the risk is that you will be tempted to say yes to anything just to get the project done and your home back to normal.
This happened with one of my clients, who decided to use a second-choice backsplash because it was in stock, whereas her first choice had a month lead time. On the other hand, a different client had trouble finding a backsplash tile she liked, so she finished her kitchen and skipped the backsplash altogether. Three months later, she found the perfect tile and brought the tile installer back. I am sure you can guess which homeowner was more happy with her kitchen remodel.
When making a large financial investment that you are going to live with a long time, I recommend that you go slowly, taking the time to find the right people to help and weighing your decisions carefully.
That being said, speed can be a necessary evil. Perhaps you are remodeling for a special event, such as a backyard wedding. Or maybe you are planning to sell the house and just want a quick face-lift to get the most out of your investment.
As a guide when weighing the need for speed vs. the need to exercise your patience muscles, I recommend you consider how long you plan to live in your home. If you’re going to sell within five years, keep in mind that everything doesn’t have to be perfect — you simply want to be sure you will get your investment back when you sell. However, if you plan to live in the home for 10 years or more, it’s worth slowing down and investing in your quality of life. Take the time to find the right solution, not the quick one.
5. The Ideal Me vs. the Real Me
This one isn’t so much a trade-off as a reality check. It’s worth mentioning that some clients have fantasies that a remodel can change their habits — or even their personalities. But my observation has been that if you are already a messy cook, the chances of a new kitchen transforming you into a clean-as-you-go type are pretty slim.
Rather than plan a kitchen for the person you wish you were, focus on solutions that take your true habits into account. For example, a messy cook who is embarrassed when guests are around might want to add a separate cleanup sink where he can hide dirty dishes while making a meal.
Or, if clutter is a constant problem, a homeowner might want to create a hidden drop zone for papers, cellphones, pens and other detritus that kitchen counters tend to attract.
How to Remodel Your Kitchen
You’ve decided to remodel your kitchen. Now what? Not knowing where to start, many homeowners fall into two camps. Some start by looking at appliances. Others start by collecting inspiring kitchen photos. Some decide they need more room. Others simply want to upgrade their current kitchen. Homeowners may find themselves in this exploration stage for a year or longer before they start interviewing kitchen designers or general contractors.
Once you’ve pondered long enough and you’re ready to green-light a kitchen remodeling project, then what? We’ll start with the first 9 steps and we’ll get into the nitty-gritty details under specific steps as we move through the complete kitchen remodel workbook.
Step 1: Think about what you need in your kitchen remodel
This step is all about how you use your kitchen, and finding the layout and features that fit your household’s lifestyle.
Think about your priorities: how many people will be cooking and gathering here, and how they’ll need to move around in it. Do you need an addition? Or can you work with your existing kitchen footprint?
If you haven’t already, start saving photos of kitchens with features that suit your style. Your collection can be organized and beautiful like a scrapbook or it can be filled with random, unorganized images. I actually prefer the latter, because I like to randomly stuff images into my folders and ideabooks and go back to them later on for edits.
Step 2: Research and plan
Ready to green-light that project and take the plunge? The best place to start is by formulating what’s commonly referred to as a scope of work and figuring out your preliminary budget.
Both of these may be subject to change, so don’t feel like you have only once chance at this. Budget and scope are intertwined and often change many times during the kitchen design process as you become more educated and able to reconcile what you want and what you can afford. As a homeowner, you’re not expected to walk into this knowing what everything should cost. Remember, this is an educational process.
Step 3: Find the professionals you will need
Even if you’re going the DIY route, unless you’re building your own kitchen cabinets and doing your own electrical and plumbing, you’re going to have to work with a professional at some point. It may be as brief as leaning on your salesperson to help you in selecting and ordering your appliances or cabinets, but it’s something to plan on either way.
Some people start by visiting big-box stores or cabinet showrooms where they can see everything. Many homeowners get referrals from friends or colleagues and start by hiring an architect or designer. Still others might work on their own with a builder or contractor. Pros are available to help you with everything from contracts and permits to space planning, budgets, choosing finishes and fixtures, shopping, ordering products, helping you set up a temporary kitchen, and managing your project from start to finish.
Step 4: Schematic design
This phase includes sketches, space planning, preliminary floor plans and elevations showing the layout and cabinet sizes. I try to keep my clients focused more on layout and space planning, even though the temptation is to talk about what the kitchen will look like. But I find that getting caught up in the look too early can distract from the space planning phase.
Plus, you need a plan in order to figure out what materials will go where, and how many square feet you will need, and ultimately how much this will cost. I like to begin the contractor interview process early and give them a preliminary drawing packet and scope of work so we can get some ballpark construction numbers. At the same time you can be sending out drawings for estimates on some top choices of kitchen finishes and fixtures.
Step 5: Fixture and finish specification
Throughout this process, and probably long before, you have been saving photos of kitchens you love into your ideabooks and folders. You’ve found your kitchen style, whether it’s modern, classic, traditional, cottage or a personal style in between. You probably know if you want a white kitchen, a natural wood kitchen, or some color.
Now you need to make your final selection of finishes and fixtures. This usually includes:
-
Cabinetry construction type, doorstyle, finish and color
-
Countertop material
-
Refrigerators and other appliances
-
Kitchen sink and faucet
-
Light fixtures
-
Flooring
-
Backsplash
-
Decorative hardware
Step 6: Work on design development and construction documents
This is the stage when you finalize the design and prepare final floor plans, elevations, details and, if applicable, mechanical and electrical drawings, lighting switch plans, and exterior elevations.
This is where your final permit set or Construction Drawings (CDs) come into play. It’s important to have finishes and fixtures selected at this time, since this is what will be considered in the final pricing from the contractor.
You’ll submit drawings for permits. These have a lead time, so check the timing with your local village. You’ll need an architect, designer or licensed contractor signed up to finalize the paperwork and pick up your permits, so get ready to hire someone in the next step. I often find that we’re submitting for permits around the same time or a little bit after we’ve placed the cabinet order, due to similar lead times.
Step 7: Get contractor estimates
If you don’t already have a licensed contractor on your project, your next step is to find one to carry the project through. I always recommend to my clients to get at least three different contractor estimates. I like to do preliminary walk-throughs with the contractors once the schematic designs are done so we can get some ballpark estimates and find out if we’re on the right track or need to pull back some to fit the budget.
Step 8: Get ready for demo
The big day is upon us, most likely something like 4-8 weeks from when you submitted for permits. Time to get that schedule firmed up and plan on cleaning out the cabinets, putting what you don’t need in storage and — if you’re living in the house during construction — setting up a temporary kitchen so you don’t lose your mind!
You may be moving out of your house temporarily, but most homeowners white-knuckle it and try to live in the house through construction. Preparation and organization can save your sanity.
Discuss the logistics ahead of time with your contractor. Will you meet once a week for updates? Will you have to be out of the house for certain tasks like demo or flooring? What about debris removal and dust? Are there any family allergy issues? What is a typical work day for the crew? Getting all this on the table beforehand can set expectations and make for a smoother ride.
Step 9: Surviving the dreaded punch list
Once construction is over, well … almost over … there’s always this annoying little list of items that are missing, wrong, or simply forgotten about. A missing light switch plate, a caulk line that shrank and pulled away from the wall, paint touch ups — small things like this, and sometimes bigger things like the hood doesn’t work, or there’s a big scratch in the newly refinished floor.
Sometimes the homeowner does the punch list. It can be as informal as an emailed list of items that need to be fixed or finished. I like to use a little form I put together that identifies the item to be fixed or finished, the responsible party and the date of completion. I send it to the client for review, changes and additions, and then off to the contractor.
It’s inevitable that the contractor may have to make multiple visits back to the house to finish these items; prepare yourself for more than one visit and you’ll be fine. The best way to approach this is with a Zen attitude. Things happen, little things get missed. It’s sort of like making a list for the grocery store and still forgetting some key ingredient. We all do it.
Wood and White Brighten This Kitchen
Article by: Monica Banks
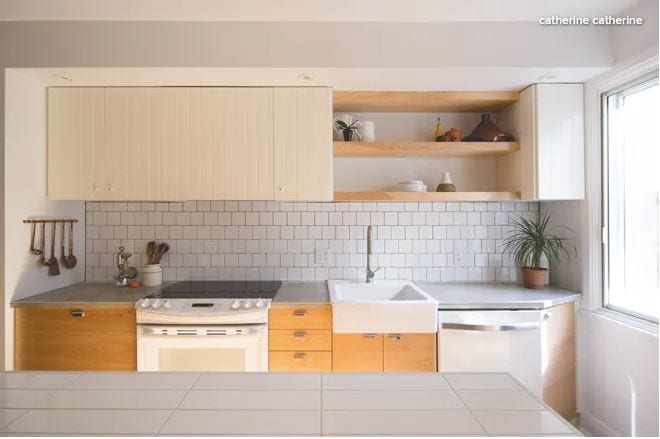
Kitchen at a Glance
Who lives here: A couple with two children
Location: Rosemont neighborhood of Montreal
Size: 210 square feet (19.5 square meters)
After living in their 1945 home for a few years, the owners decided it was time to expand their 155-square-foot kitchen, which lacked sufficient storage and felt cluttered. Originally, the home was designed in the typical Montreal fashion, with one corridor that has separate rooms branching off from the axis. The homeowners wanted not only to have more space, but also to give that space an open-concept feel.
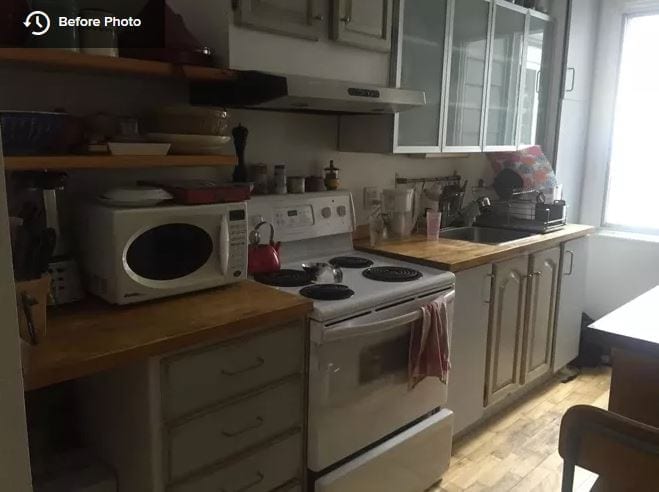
Before. In this snapshot taken before the remodel, the existing kitchen had an eclectic look; the homeowners wanted to give it a cleaner, more minimalist design style.
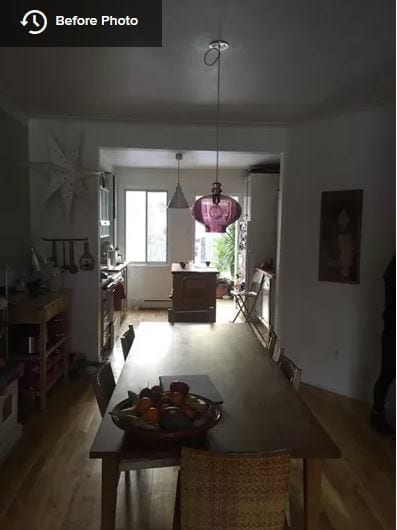
Before. The kitchen also felt a bit closed in, thanks to the side walls surrounding the entry opening into the space.
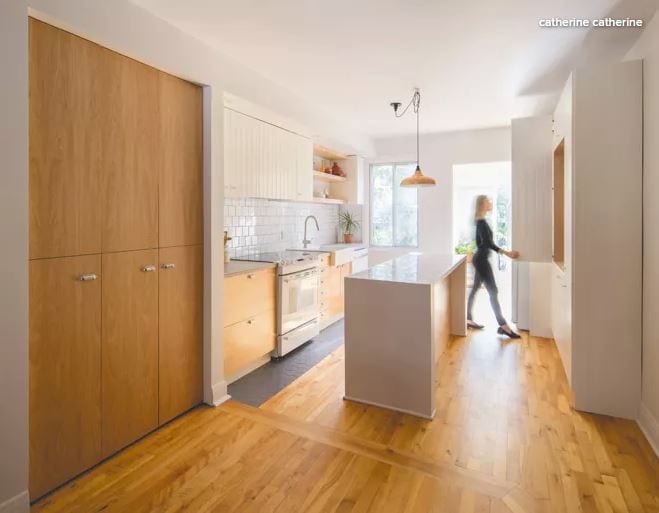
Kitchen (After)
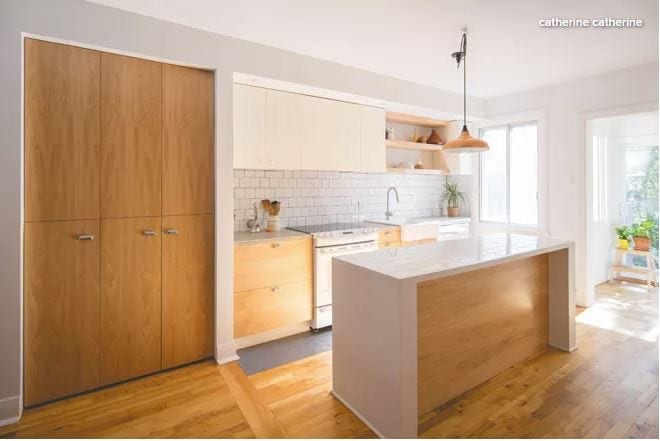
Layout. Removing those side walls and opening up the kitchen to the adjacent dining area created more breathing room and brought in more light. The right side of the room is composed of wall cabinetry that gives the family plenty of storage space. The kitchen is now 210 square feet.
Style. Though the kitchen has a simple palette of primarily wood and white, the space feels dynamic thanks to variation in the textures and shapes — from the subway backsplash and the hexagon floor tiles to the beadwork on the upper cabinets and even the horizontal lines marked by the open shelving.
Floor. The homeowners kept the existing cherry floor but had it sanded and refinished.
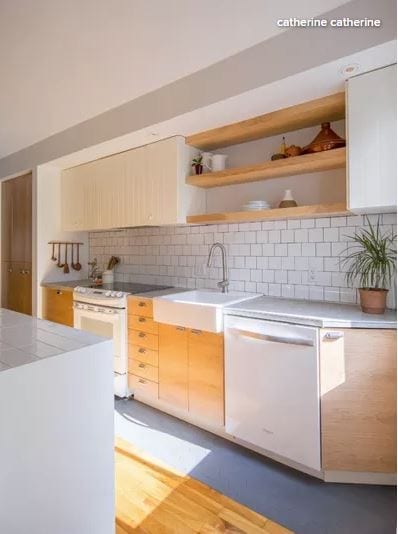
This photo shows the left side of the kitchen (when viewed from the dining room). On the floor in front of the sink, the homeowners added a strip of hexagon tile for visual interest.
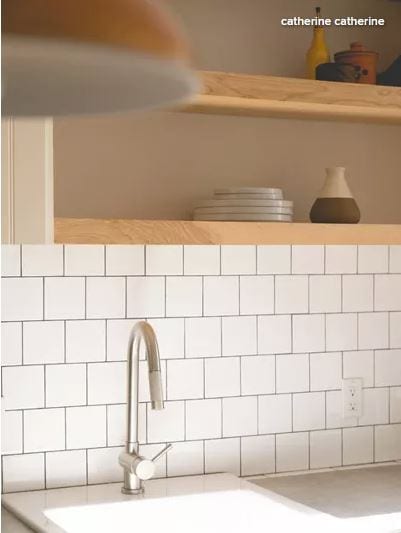
Backsplash. Simple white ceramic subway tile gives the room subtle detailing that supports the kitchen’s clean, modern look.
Island. The island countertop is covered with multiple tile pieces (see first photo in this story) that echo the subway tile pattern.
Cabinets. A two-tone cabinet scheme contributes to the kitchen’s contemporary feel. The majority of the cabinetry and hardware is from Ikea, but the wood doors were handmade by a local artisan.
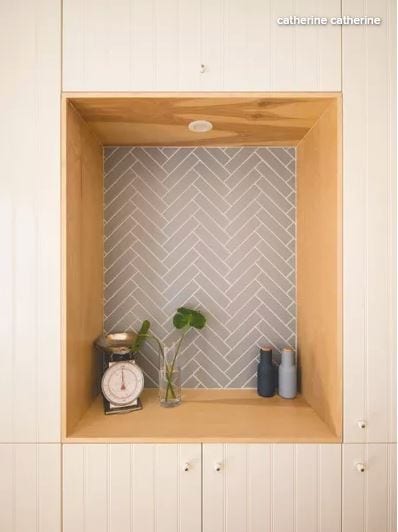
Niche. The cabinetry wall on the right side of the kitchen is broken up by a central nook that the designers finished in herringbone tile.
Smart Investments in Kitchen Cabinetry — a Realtor’s Advice
The kitchen is the most expensive room in the house to build. The national average cost of a kitchen remodel is $50,000, though the real cost can vary widely, depending on where you live, the scope of the project and the materials you choose. New cabinetry can take up much of that expense. Make the most of this big purchase by treating your new cabinets as an investment.
Realtor Victoria Gangi offers insider tips on how to get the best return on your cabinet investment, even if you’re not moving in the foreseeable future.
Reclaimed Siding and Red Accents Personalize a White Kitchen
This home’s salvaged siding adds a warm touch to a kitchen with a built-in desk and nearby mudroom.
10 Storage Solutions for Kitchens With Character
Article by: Joanna Simmons
Kitchens are all about storage, but it can become rather predictable: Think rows of built-in cupboards and wall cabinets, with an emphasis on practicality over personality. So how can your cooking space ingeniously accommodate everything you need while also looking original and exciting? These 10 great solutions offer some fresh ideas — not to mention storage eye-candy!
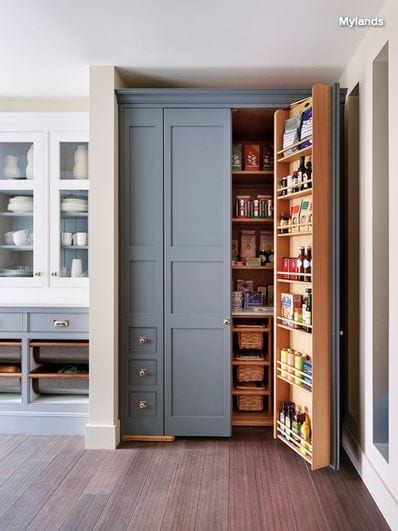
Go full-size. Pantries are huge news in kitchen storage and for good reason. While a conventional base unit requires you to get down on your knees with a flashlight to find that last can of beans, anything stored in a tall pantry like this one is easily visible and accessible.
Typically fitted with drawers, racks, baskets and even lighting — and performing valiantly even when ultra-slender — these modern beauties offer plenty to love.
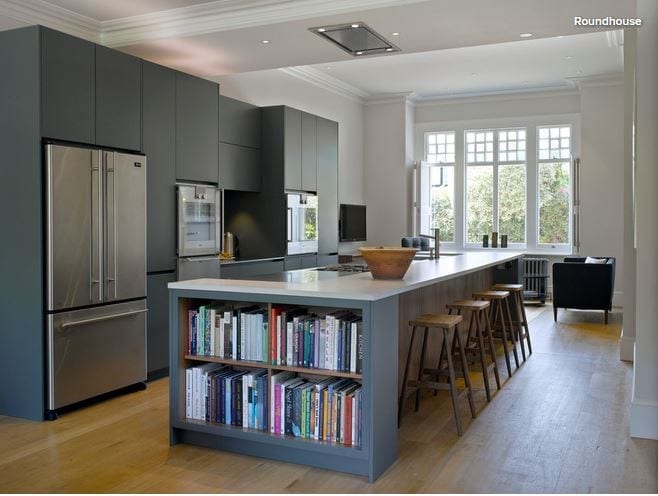
Create an island library. Passionate home chefs accumulate lots of cookbooks over the years, but not always the space to store them. Volumes kept near the stove can become scruffy and grease-spattered and perhaps don’t merit being displayed prominently.
How about this, though: neat shelves on the end of an island? The books are visible — and add color — without being central to the design of the kitchen, and they’re easy to grab when you’re searching for a recipe.
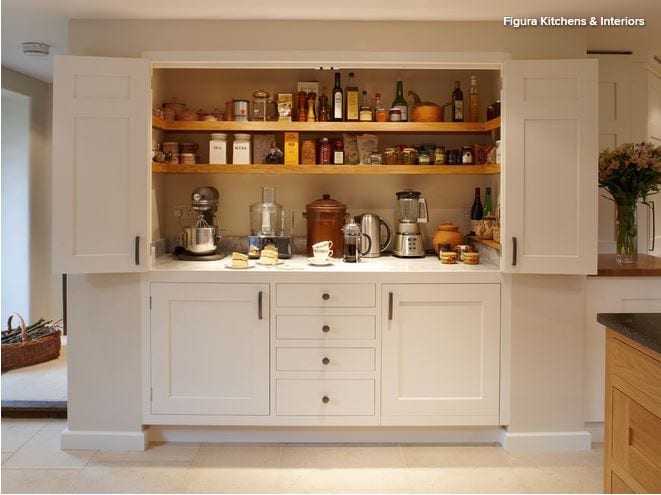
Scale up. A pantry that’s also a breakfast station is sure to set any storage fanatic’s pulse racing. This is perhaps the ultimate piece of kitchen furniture, one most of us can only dream about.
It combines oodles of storage with a dedicated space where you can prepare your coffee and toast. You can then stand and gaze at your neatly arranged shelves while you eat. Life doesn’t get much better than that, does it?
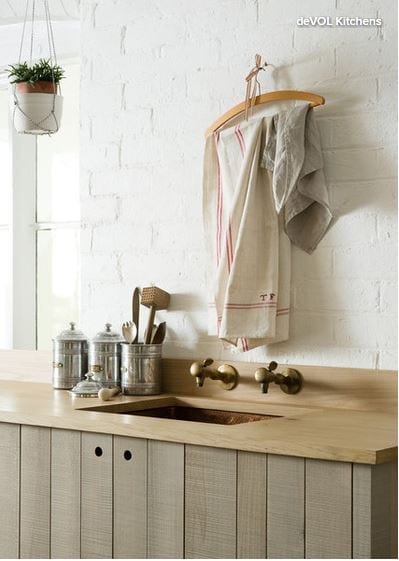
Repurpose a hanger. Dish towels go on a cupboard or oven door handle, right? Wrong. You can hang them on a hanger that is hanging on the wall! Original, quirky, inexpensive storage.
Carve out space for the unwieldy. Chopping boards and trays are sizable, often heavy pieces that benefit from a dedicated home like this compartment incorporated into a run of cabinets. It’s such a simple little storage detail, but so invaluable.

Ditch convention. This pale and unpretentious kitchen may not be to a neat freak’s taste, but there’s something to be admired in its anything-goes approach to storage.
Superficially cluttered though it may appear, I suspect its owner knows exactly where everything is and that all the essentials are within a quick grab from the stove.
Opt for a lovely long shelf. There’s a growing trend for long shelves that simply break up a run of units rather than provide workaday storage. They can become home to beautiful objects or the odd cookbook or plant, helping to personalize a built-in design and lighten its look.
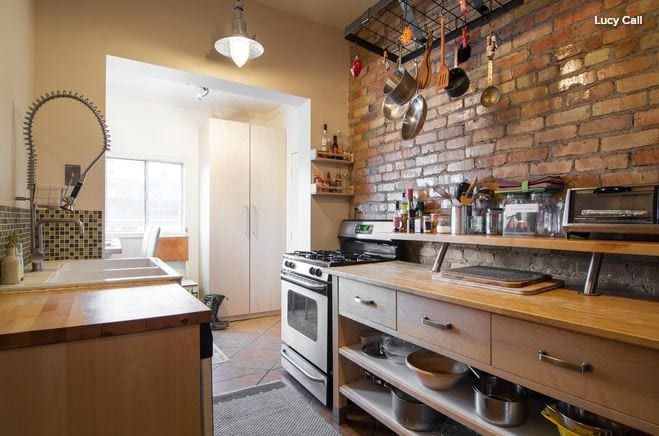
Hang it high. Making use of vertical space is a smart move in a kitchen, where storage often has to be worked into a small footprint. This space features a metal rack that was probably never intended for a kitchen but works beautifully holding pans and utensils.
It’s attached high on the wall to reduce the risk of banging a head against a frying pan!
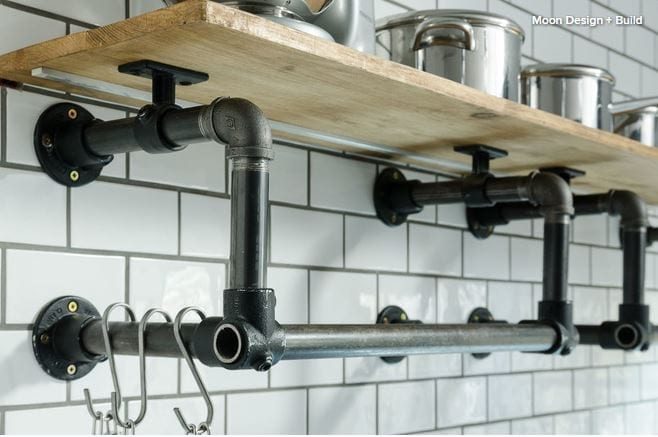
Resist the sleek. Kitchen design often tends toward the sleek and efficient, but it can also rock a more edgy, homemade look while still packing in tons of practical storage. So think laterally and use old piping and boards to make some shelving — you’ll get storage and original style at the same time.
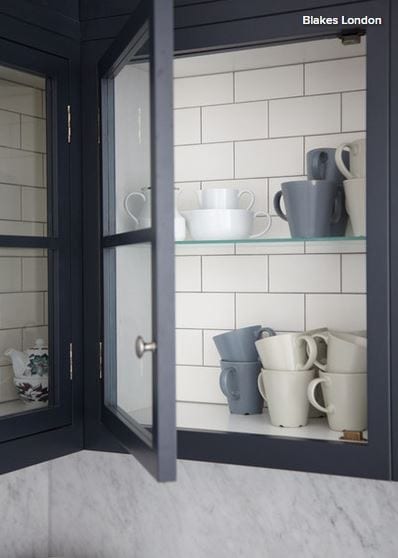
Add a twist to the typical.Kitchen storage needs to be well-designed and abundant enough to hold everything from mugs to marmalade. But really great kitchen storage does it while adding a twist of unique style.
These glass-fronted cupboards are fairly basic, but the tiling on the interior adds detail and interest and contributes to the kitchen’s industrial feel.
12 Stylish Kitchen Counters That Seem to Float in Space
Want your kitchen countertop to be the hero of your new cooking zone rather than relegated to the background? One way to do that is to look beyond the basic block-like counter and incorporate a cantilevered, or floating, countertop into your kitchen design instead. Here are 12 cantilevered counters that not only offer showstopping style but also enhance functionality and create the illusion of more space.
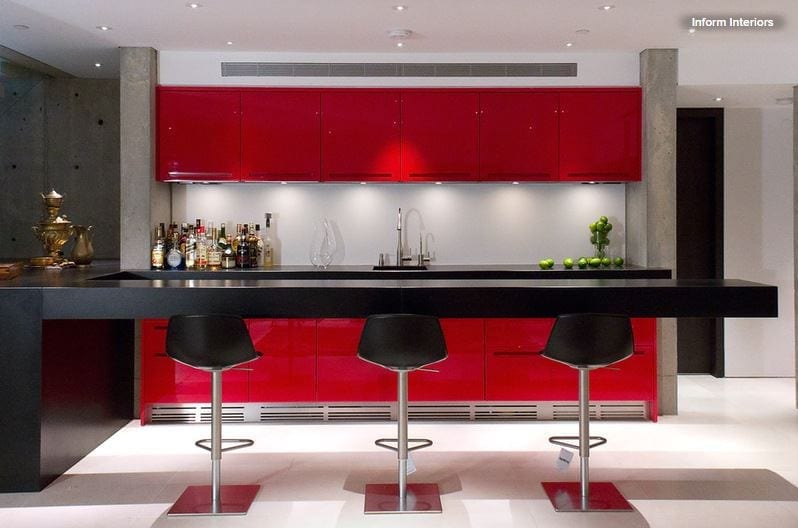
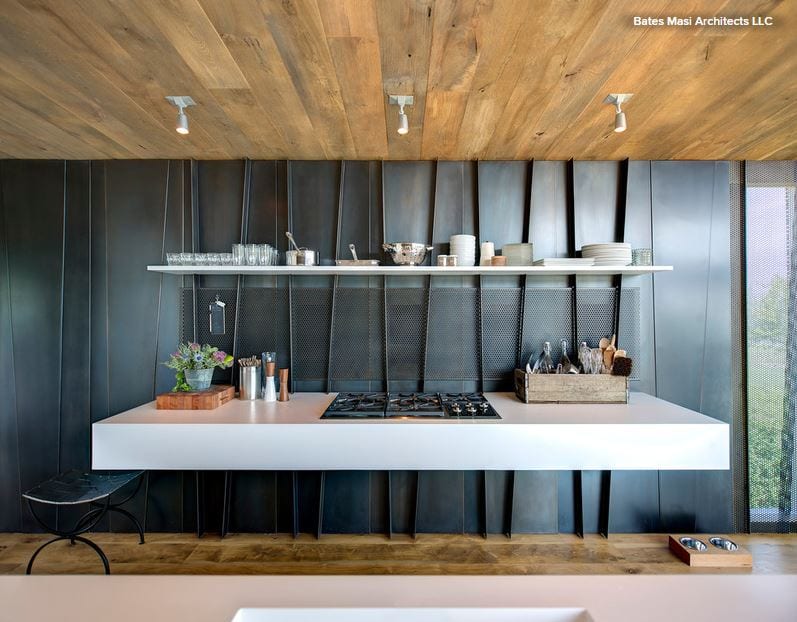
1. Suspended reality. This may look like an optical illusion, but there was no hocus-pocus involved when this striking, impressively long floating counter was built — that we know of, anyway. Its gravity-defying design is just one reason this cantilevered countertop commands attention. Its luxe, chunky look and sleek black color (which boldly contrasts the vibrant red cabinetry opposite) also ensure that the suspended structure exudes jaw-dropping appeal.
The expansive bar provides plenty of room for several people to sit and enjoy a drink or meal, while the open area beneath ensures that spills and crumbs can be cleaned up with ease, making this an ideal setup indoors or outdoors.
Tip: If your countertop is thick, opt for minimalist stools with a slim profile so the design doesn’t appear too heavy.
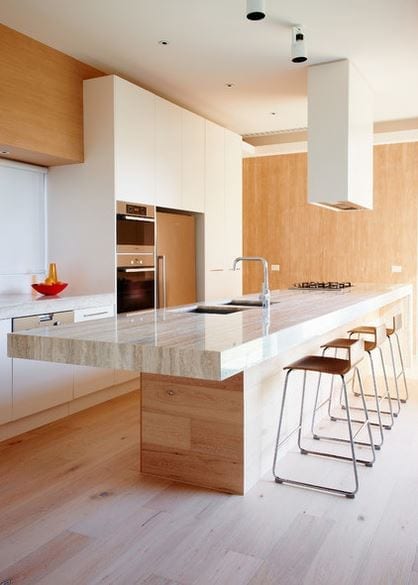
2. Natural wonder. If you want to infuse your kitchen with warmth, subtle sophistication and an air of luxury, consider a cantilevered-counter combo of natural stone and timber. Here the suspended style showcases the quiet beauty of the travertine top, while the wood cabinetry below softens the look and complements the stone’s neutral tones.
But style isn’t all this counter has to offer. The cantilevered top also provides additional workspace (which helps offset the area taken up by the double sink and stovetop farther down the island) and room for extra chairs, which comes in handy when entertaining.
Tip: When choosing wood to pair with your stone countertop, look for one that’s free of prominent knots or patterns that could clash with the veining of the natural stone.
3. Minimalist chic. Although this cantilevered surface is a dedicated work zone, it also succeeds in injecting this modern rustic kitchen with a hearty dash of visual interest. The clever floating contraption is anchored to the wall by way of steel tabs that protrude from the metal surface and double as decorative elements that transform the vertical surface into an accent wall. Crisp white was a smart color choice for the surface, as it cuts through the room’s moody palette, while the thickness gives the space a clean, contemporary feel.
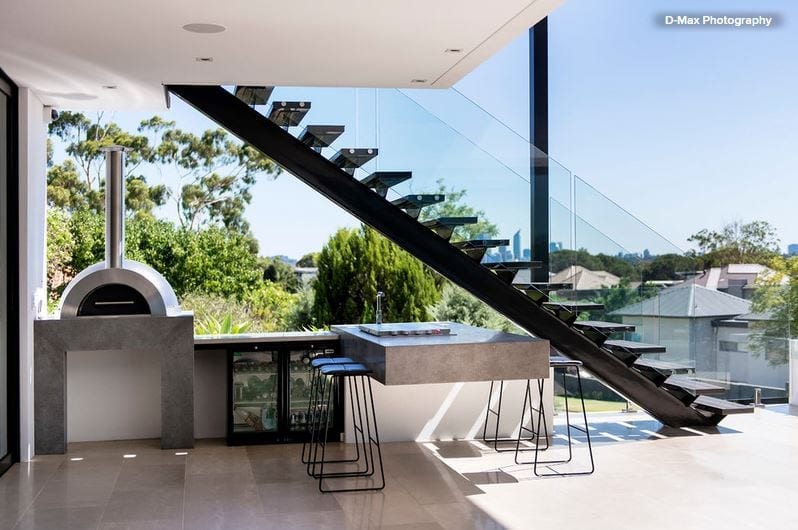
4. Cool and clean. If you hate being on cleanup duty after a family barbecue, a floating concrete counter like this one will make the chore a little easier to bear. Thanks to its suspended design, crumbs and spills can be swept or hosed away quickly. Polished cement also is durable, stain resistant and easy to clean, so it doesn’t require much effort to make the surface look as good as new after entertaining.
Also, note how the cool gray surface adds an industrial edge to the contemporary outdoor kitchen and entertaining area, while the countertop’s bold lines and streamlined look complement the sleek style of the space.
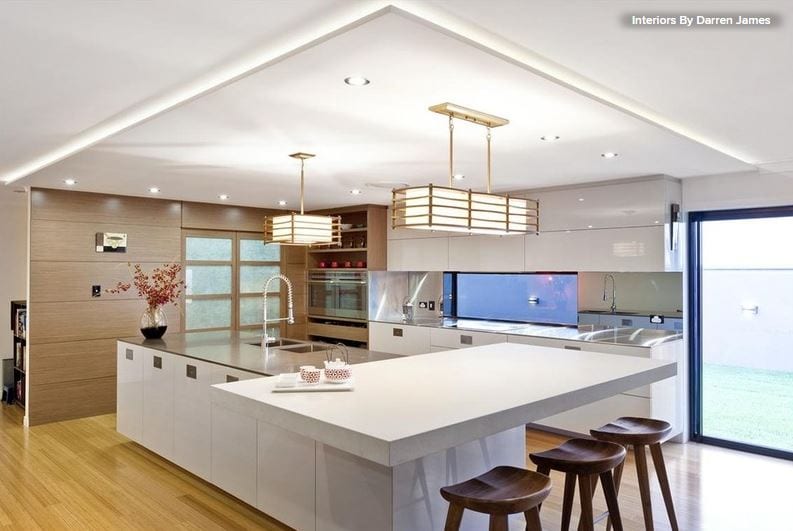
5. On the side. Now here’s a chic cantilevered counter with a twist. Rather than extending a section of the thin, neutral-toned countertop past the end of the island, designer Darren James placed a separate slab of stone (in a contrasting tone and thickness) on top and rotated it to sit across the width of the workspace. This not only helps define the cooking zone and visually separate it from the surrounding open-plan area, but also makes the space feel more communal, as the seating faces inward, fostering a sense of togetherness.
As you can see, the contrasting look and unique configuration of both counters also succeed in transforming a basic island top into a statement-making design feature.
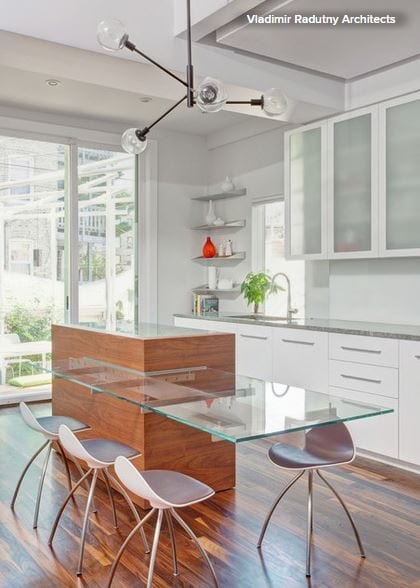
6. See-through style. Don’t be too hasty to say, “Nuh-uh; no way” to a floating glass countertop. Sure, they’re not for everyone (like those with young kids), but they can work for some in the right space.
Here an eye-catching glass countertop appears to jut out from the corner of a taller wood prep zone. It’s stabilized by a metal bracket that supports the see-through surface. The material was selected to enhance the airy, spacious feel of the kitchen, and coupled with the suspended design, it successfully does just that. Although it’s an unconventional choice for a kitchen countertop, the structure here was designed to be a eating area, rather than a food-prep space, so the material should hold up fine.
7. Family friendly. One design trend we’ve seen in the kitchen project section of Houzz is the integrated kitchen counter–dining table. This elegant transitional-style cooking and eating area shows how this concept takes shape with the help of a cantilevered countertop.
Here the floating counter has been lowered so that it stands at table height, rather than matching the height of the adjacent concrete counter. This allows for more comfortable and ergonomic seating (unlike bar stools, which can sometimes cause aches and pains in your back and legs after you’ve been perched on one for a while —or does that just happen to short people like me?). This means your family and friends won’t mind sitting around the table for long meals and lengthy catch-up sessions.
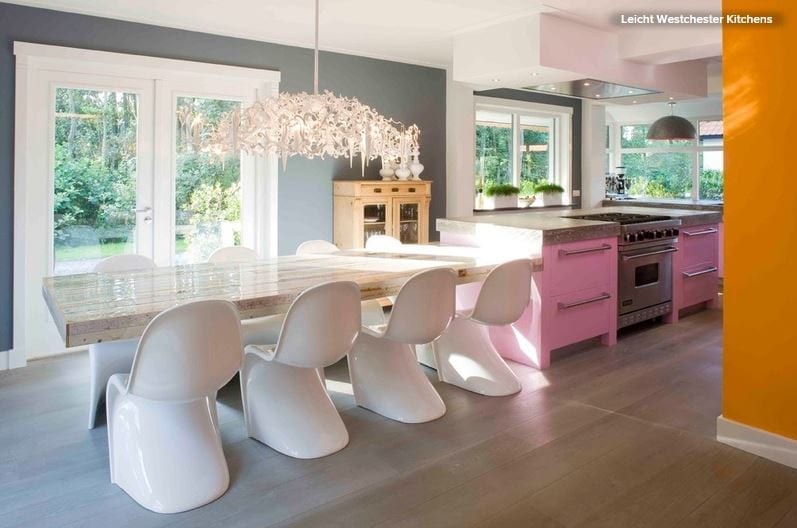
The long, cantilevered counter provides loads of visual appeal too. The rustic, reclaimed wood table contrasts beautifully with the contemporary pastel pink cabinetry and industrial-looking cement counter, creating a space that oozes subtle sophistication but still makes a strong style statement. White retro-style dining chairs complete the look and add another layer of interest to the eclectic scheme.
8. Optical illusion. This stunning counter may appear as if it’s floating, but if you look closely, you’ll see that there’s actually a mirror-finish post that supports the stunning granite countertop from below — how sneaky! Even so, this showstopping cantilevered-look counter still deserves a mention, since it achieves the same airy, space-enhancing look as a suspended countertop, albeit with some help from a supportive friend.
Here it’s not just the striking countertop material that makes a dramatic statement. The undercounter lighting and the way the granite appears to be embedded in the white Caesarstone island also take the stylish kitchen counter to new heights. The lowered height of the bench makes this casual dining area more practical and comfortable, too.
Tip: If you’re worried that a natural stone countertop may be too high maintenance for you, choose an engineered stone or a high-quality laminate instead.

9. Green with envy. What was the first thing that caught our eye when we spied this cool cooking space? The striking island, of course — though the shimmering disco ball–like pendant light probably came in a close second. While the island’s eye-popping lime-green base immediately attracts the eye, the dramatic lines of the thick floating concrete top also command attention.
Polished concrete is a stylish and practical kitchen surface choice, as it not only injects any space with a cool, contemporary edge, but is also extremely low maintenance and environmentally friendly, making it ideal for those who desire an ecochic cooking zone that’s a breeze to clean. Did we mention the material is very affordable, too?
10. Space age. If you want to make a bold statement in your kitchen, opt for a cantilevered counter that’s fashioned from an interesting material in an unexpected shape, such as the cutting-edge, contoured design shown here. LED lights fitted underneath add to the freestanding form’s space-age vibe and help highlight the showstopping centerpiece.
Thanks to its tall height, there’s plenty of room to tuck several bar stools below the counter, which helps keep the pathways free of obstacles and ensures that the room maintains its clean, uncluttered look.
Tip: Install tinted LED strip lights below the floating countertop for a more dynamic and colorful look.
11. Going round. Worried that a suspended countertop won’t work in your spatially challenged cooking zone? This chic U-shaped kitchen shows how it’s done. Here a round floating bar is cantilevered out from the wall and floor cabinets, providing a spot for casual eats, an additional workspace and a social hub where family and friends can mingle when you’re entertaining. It also adds another layer of visual interest. Notice how the counter’s smooth, curved shape contrasts with the sharp lines and boxy forms that are used throughout the area.
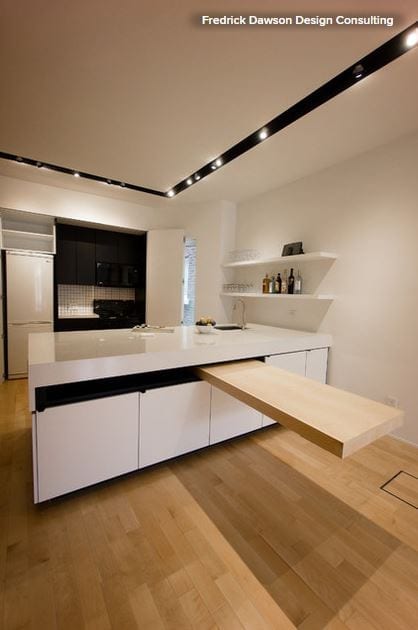
12. Hidden treasure. Now you see it; now you don’t! A space-savvy cantilevered pivot table like this one is a clever, creative addition that will boost the functionality of any compact cooking zone. When extended, the table enhances the visual appeal of the space, thanks to its sharp lines and striking silhouette, transforming the otherwise basic kitchen counter into an interesting design feature. Note how the blonde timber and subtle wood grain echo the timber used underfoot and add warmth to the cool white palette, too.